Aeethera Documentation
Complete guide for using Aeethera.
Getting Started
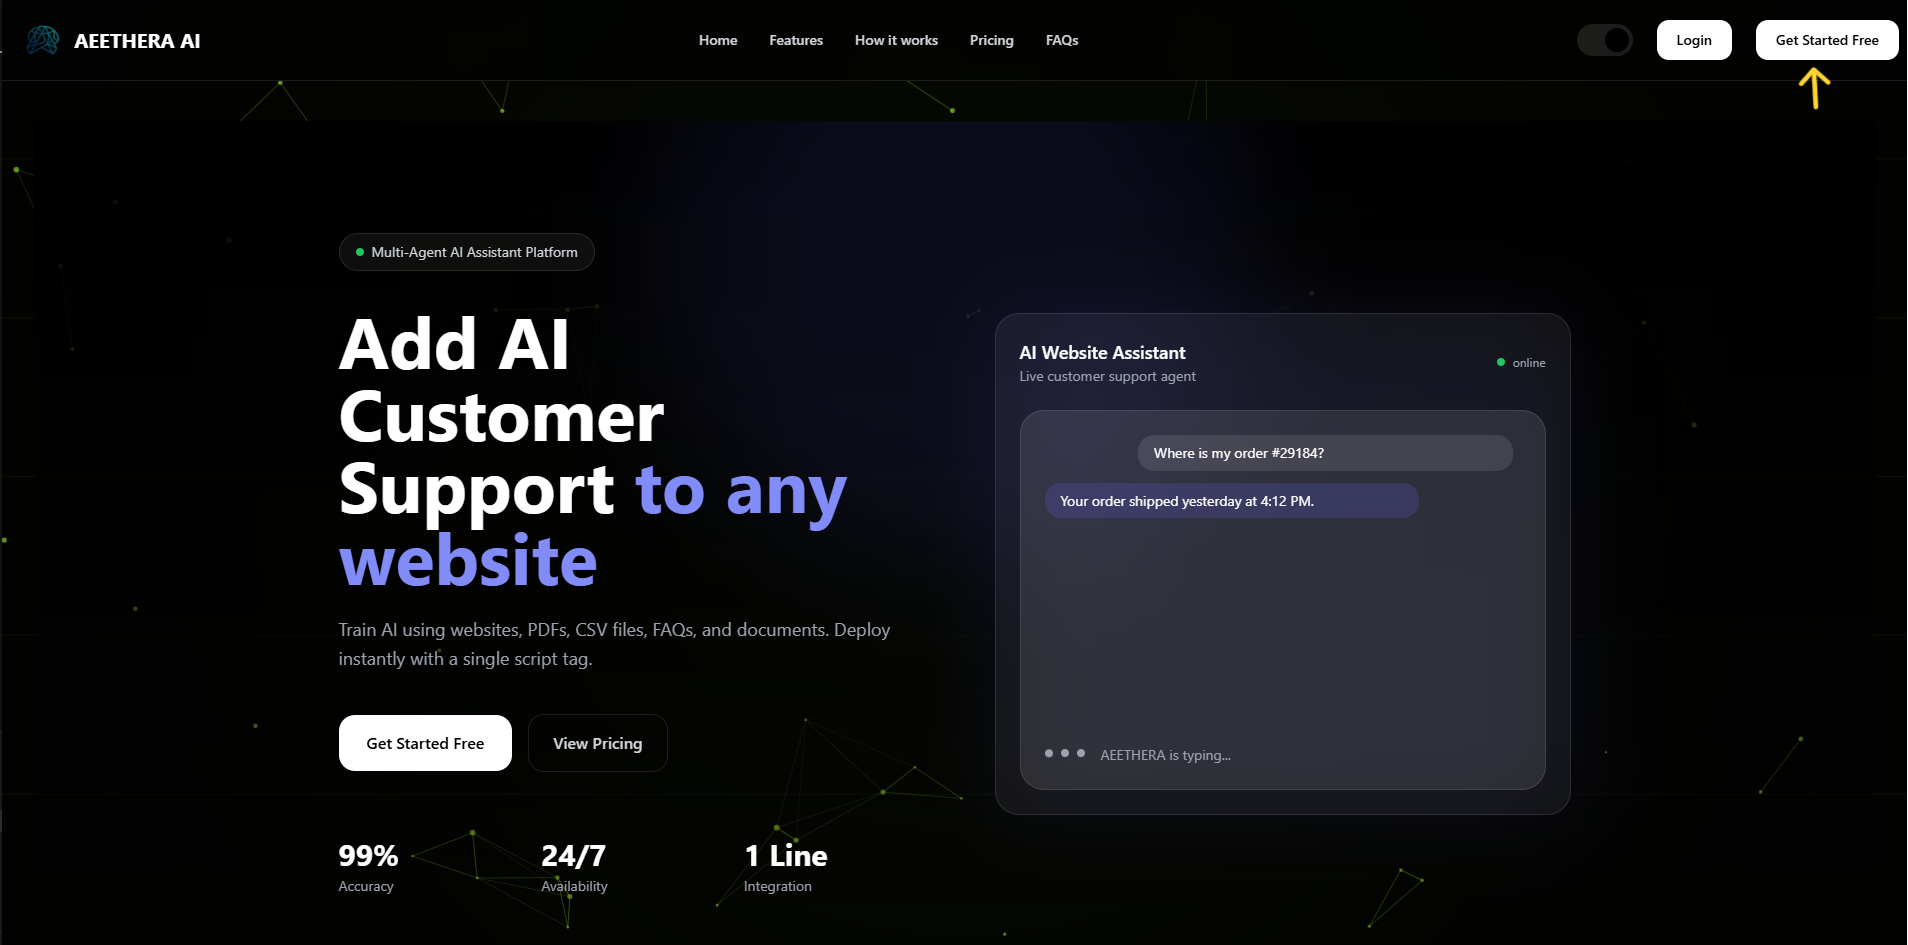
Step 1: Start from Homepage
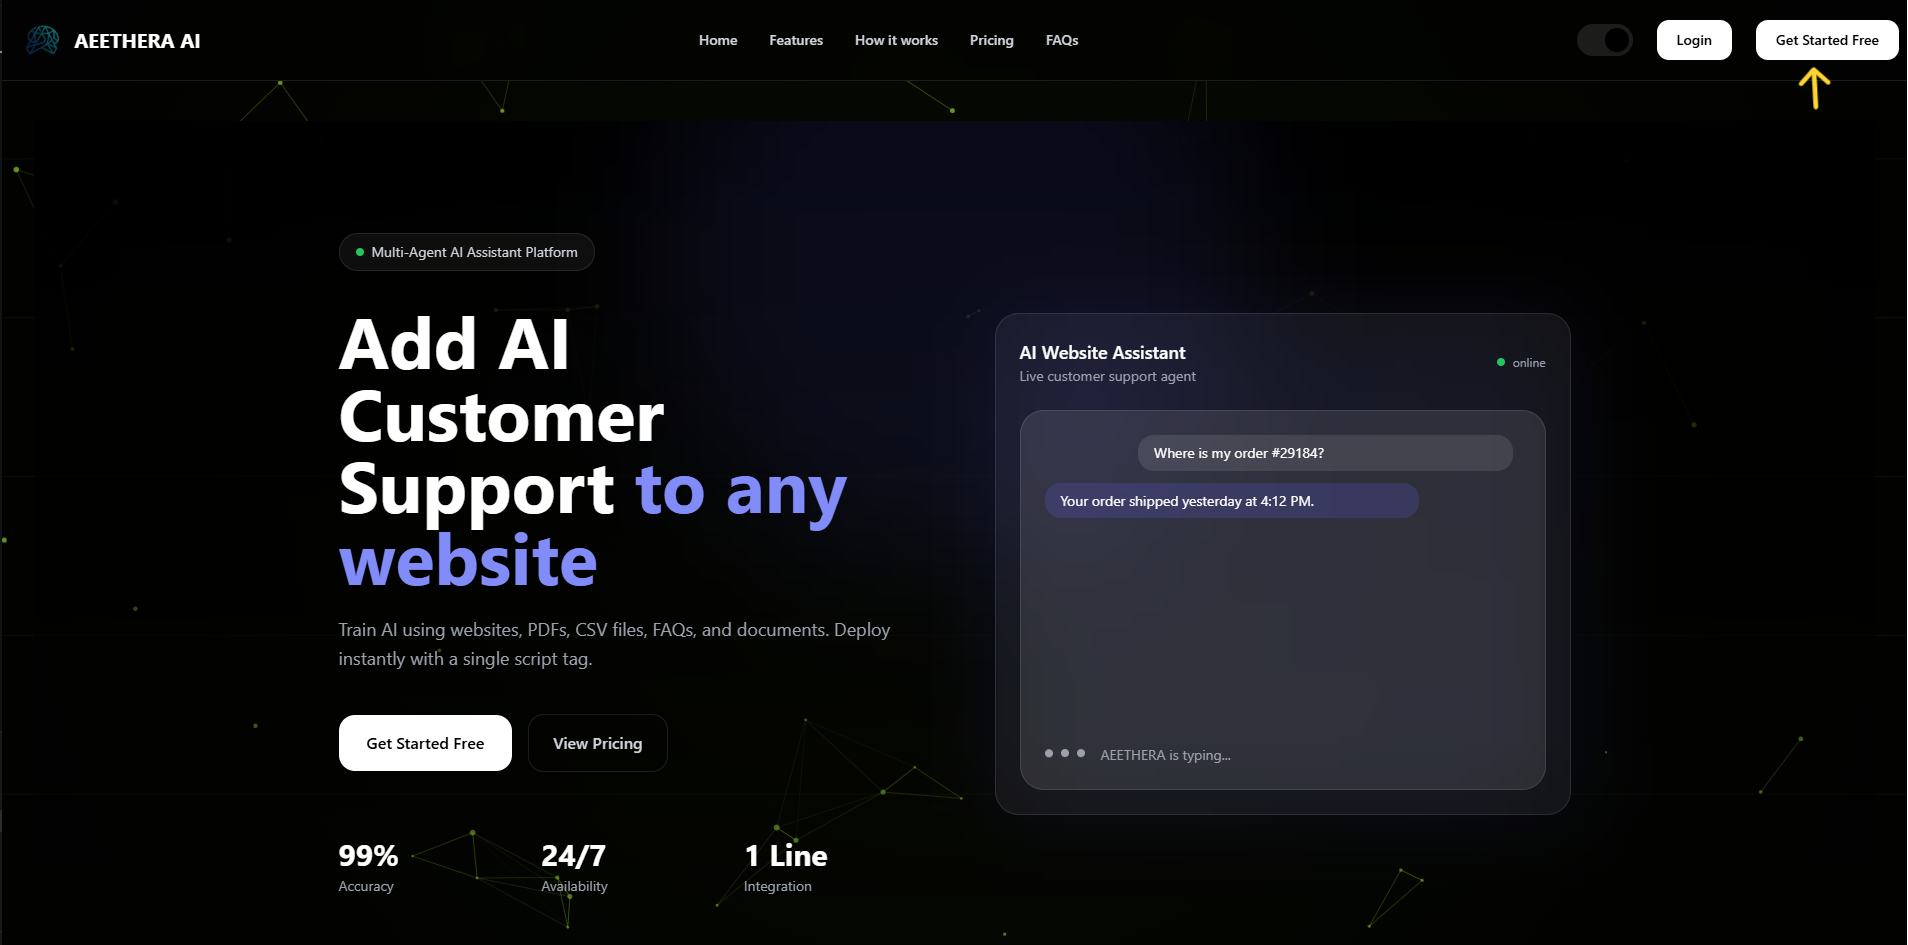
To start using Aeethera, click the "Get Started Free" button on the home page.
Step 2: Create Your Account
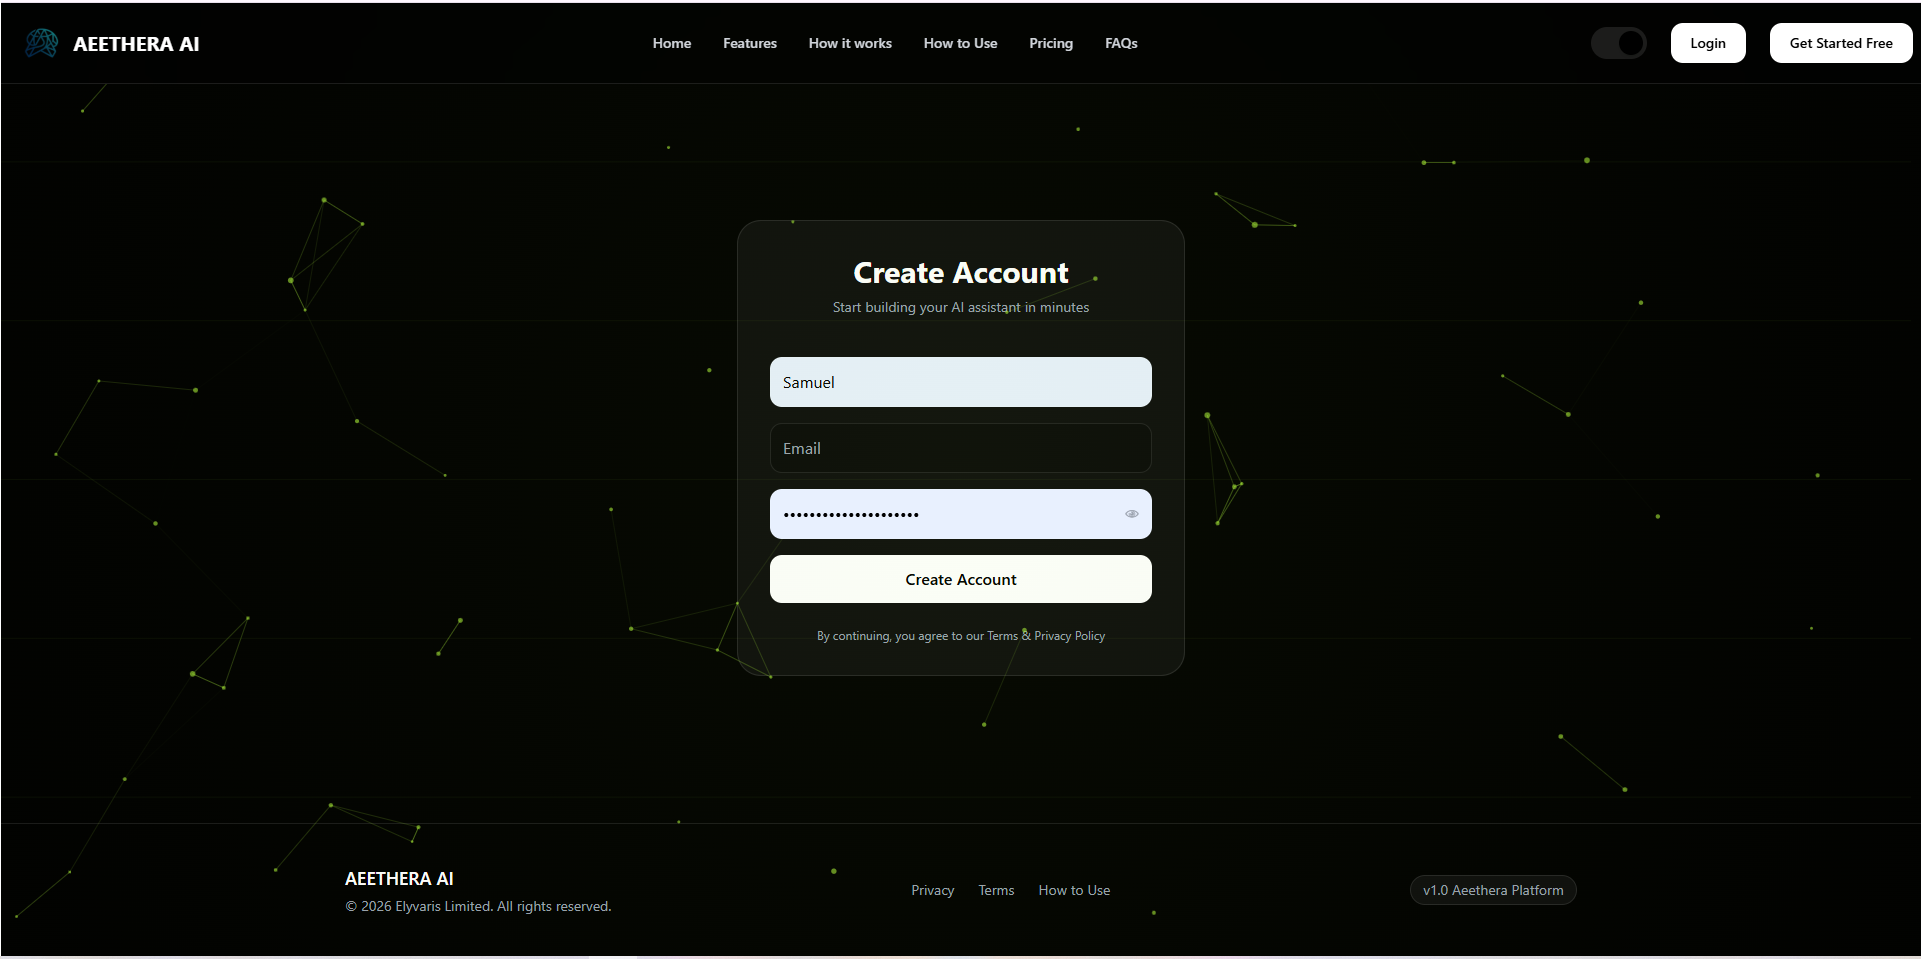
You will be taken to the registration page where you enter your username, email address, and a password.
- Email must be unique
- You must accept Terms & Conditions
Step 3: Company Onboarding
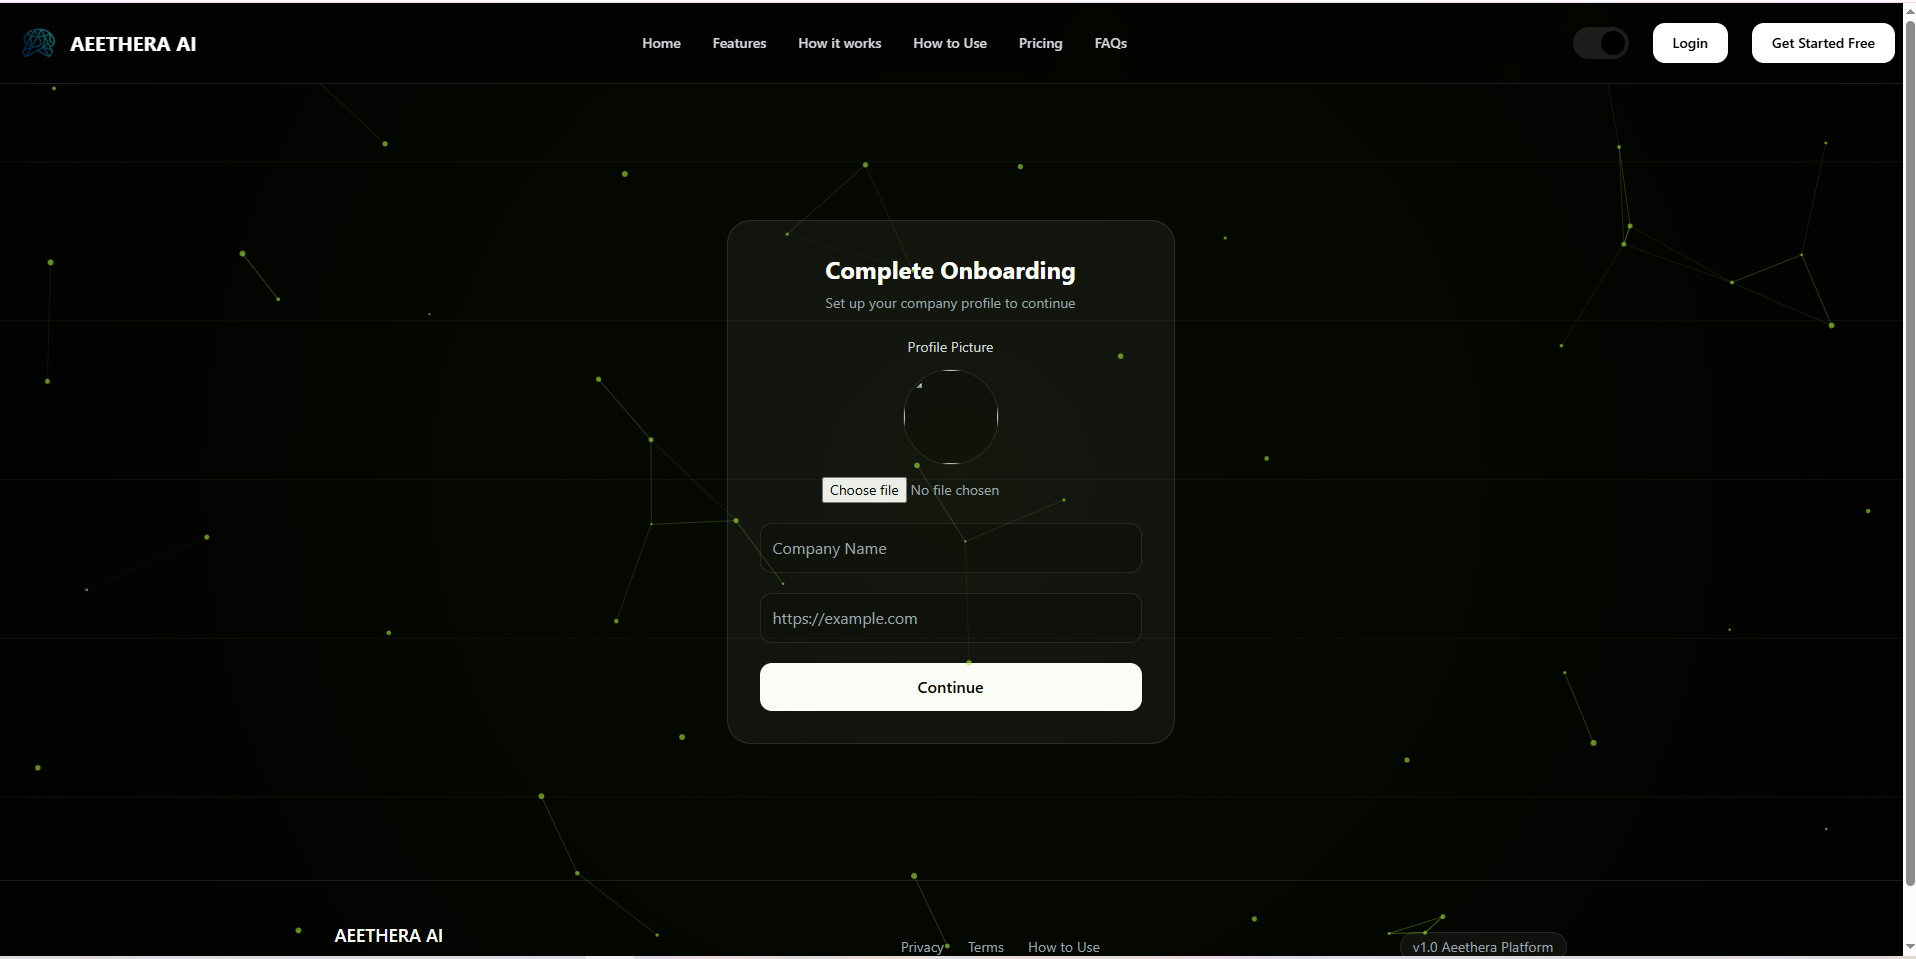
After registration, you’ll be taken to the Company Onboarding page. You must provide your company name and website.
- Company name must be unique
- Website field is required
Important Information About Company Administration
- The creator automatically becomes the Company Administrator
- There can only be one administrator per company
- Admin privileges cannot be removed
We recommend using an official company email for registration.
Deleting Your Account
To delete your account or company profile, contact support at [insert contact email]. Your data will be permanently removed after verification.
Logging In
Step 1: Open Login Page
To log in to Aeethera, click the "Login" button on the home page.
Step 2: Enter Credentials
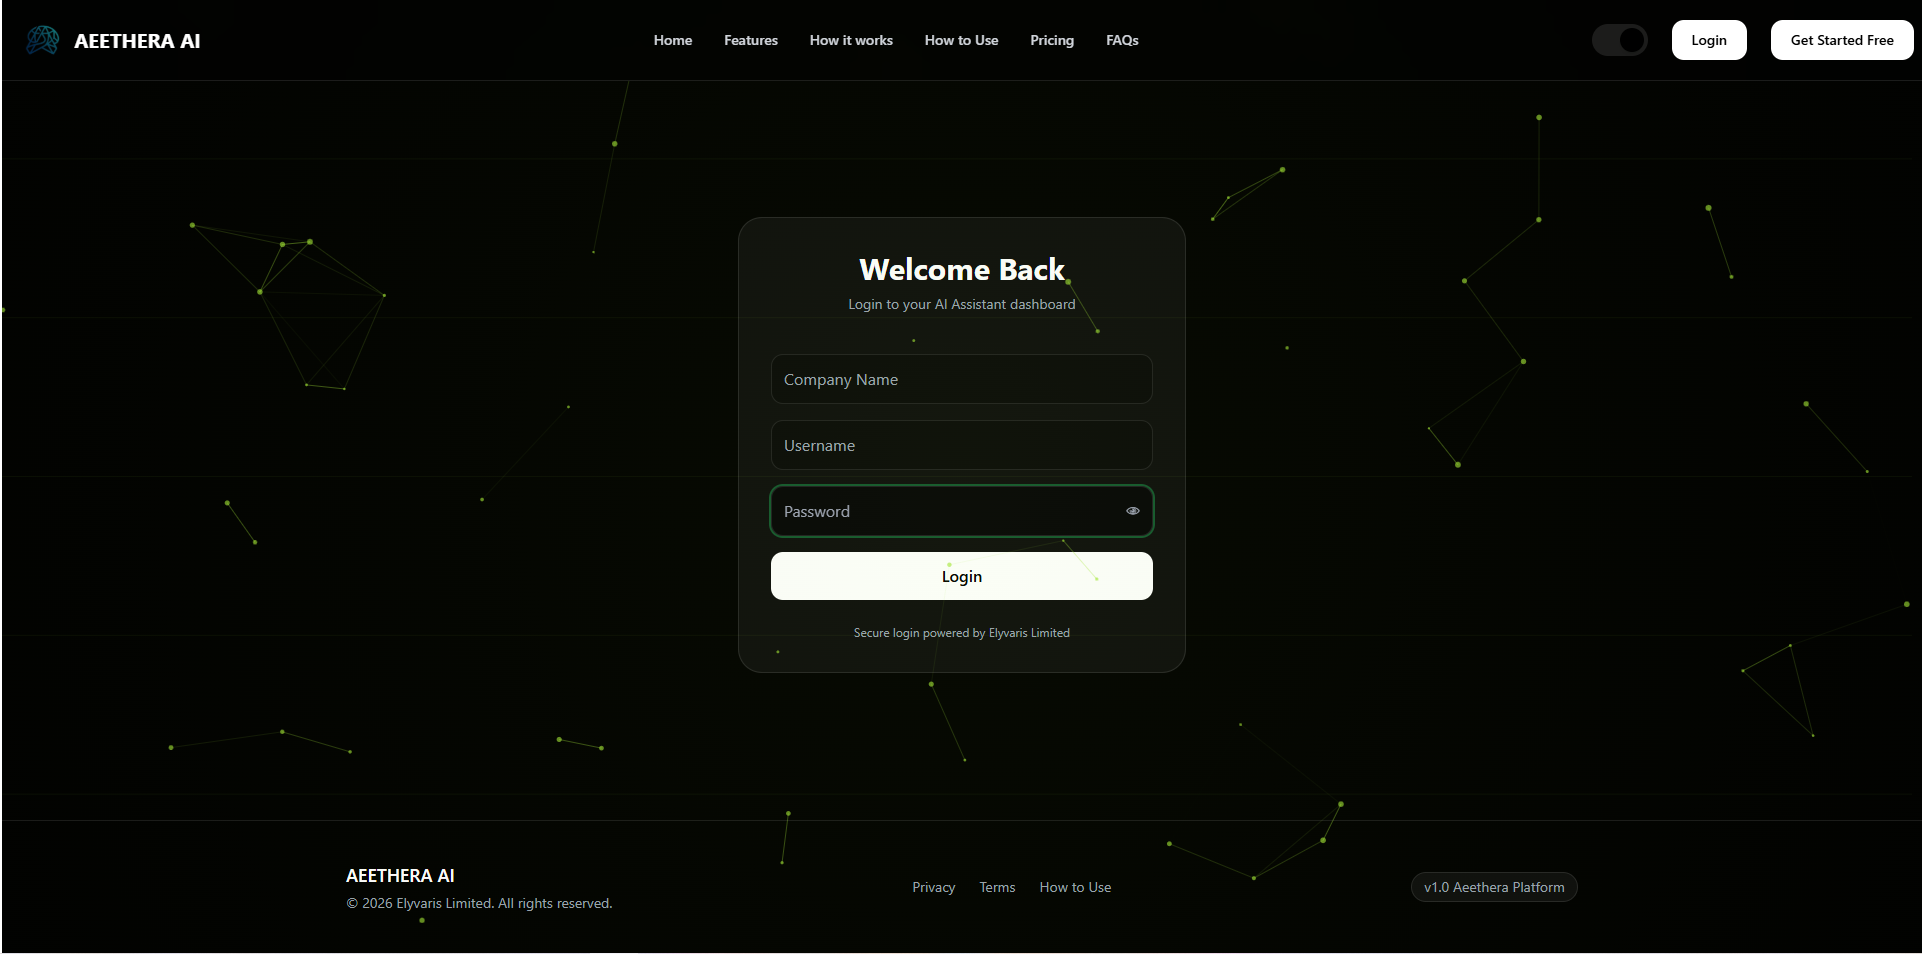
You will be redirected to the login page where you must provide:
- Company Name
- Username
- Password
Please ensure that all the information you provide is accurate. Note that all fields are case-sensitive, meaning uppercase and lowercase letters are treated differently.
Step 3: Troubleshooting Access
If you are a company member and are unable to log in, please contact your company administrator to reset your account credentials.
If you are the company administrator and have forgotten your password, click the "Forgot Password" link on the login page to recover your account and regain access to your dashboard.
Dashboard
Dashboard Overview
After logging in or completing the sign-up process, you will be taken to your company's dashboard. The dashboard provides an overview of your company's activity and key performance metrics.
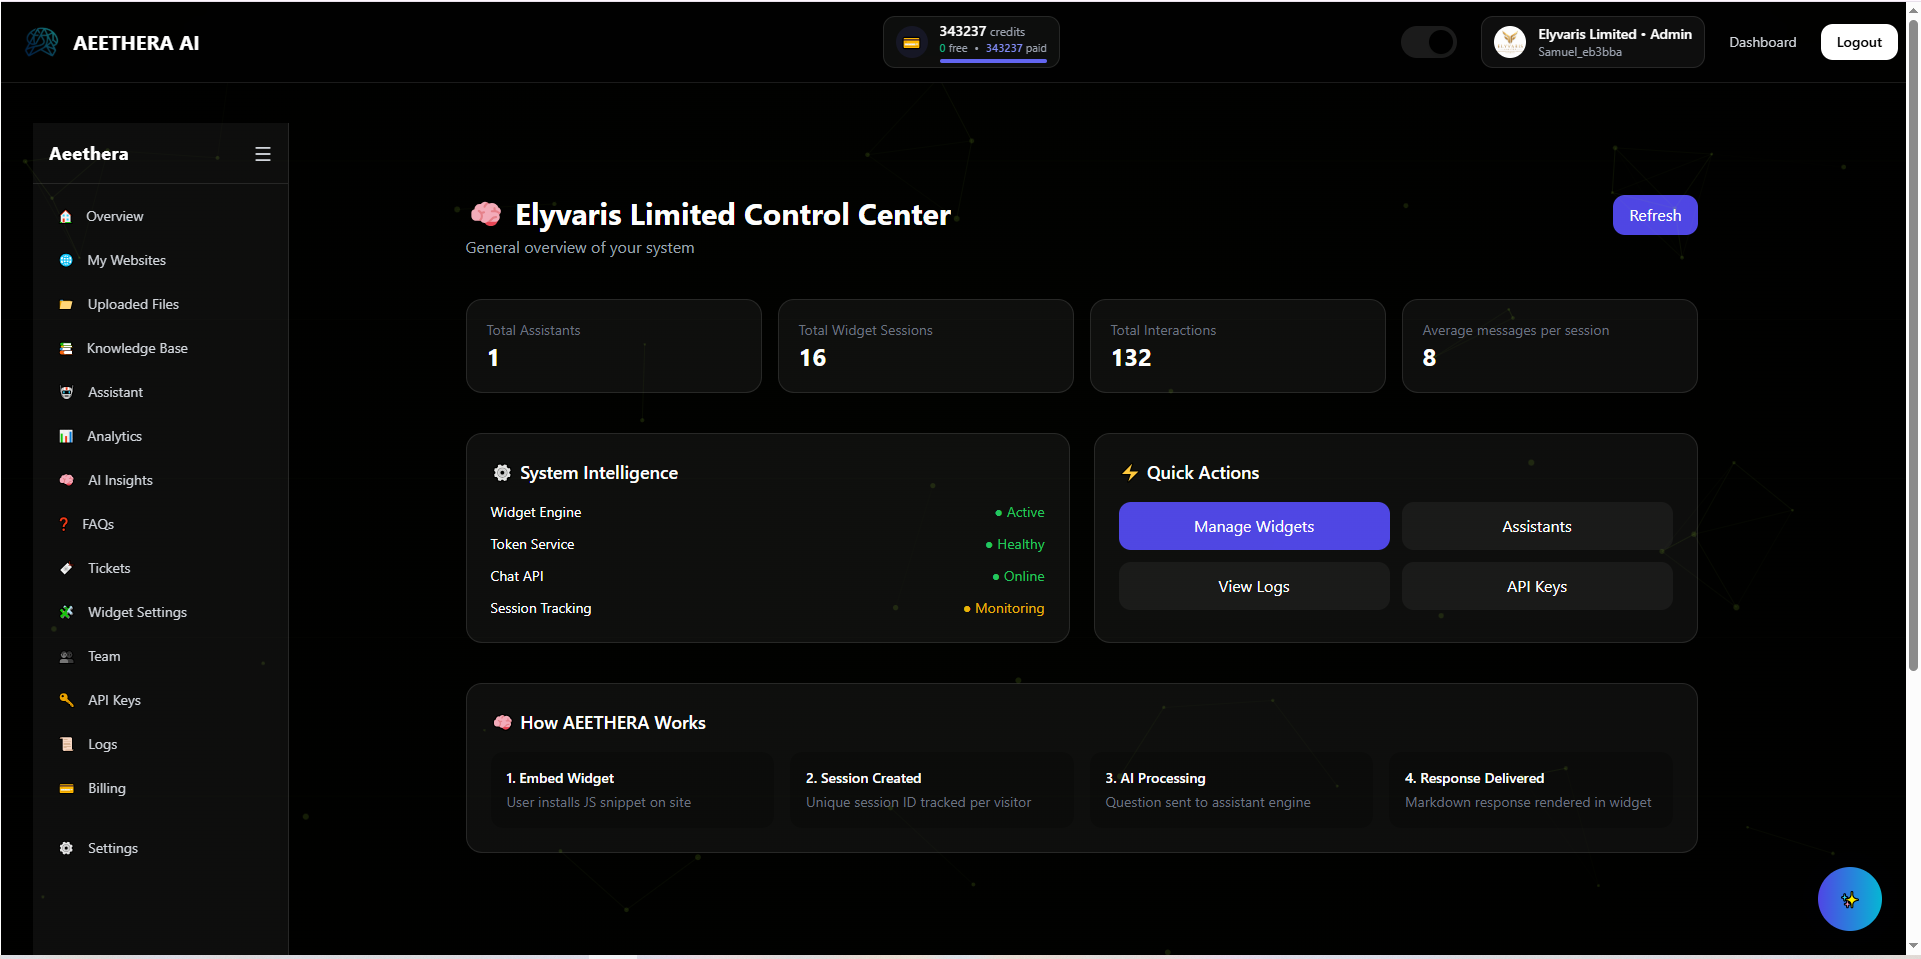
On the dashboard, you will find the following information:
- Total Assistants – The total number of AI assistants created by your company.
- Total Sessions – The number of unique user sessions that have interacted with your assistants.
- Total Interactions – The total number of conversations or interactions across all your assistants.
- Average Messages per Session – The average number of messages exchanged during each user session.
These metrics help you monitor your assistants' usage, understand user engagement, and track the overall performance of your company's AI services.
Websites
Website Overview
The My Websites page allows you to monitor and analyze the performance of your company's websites.
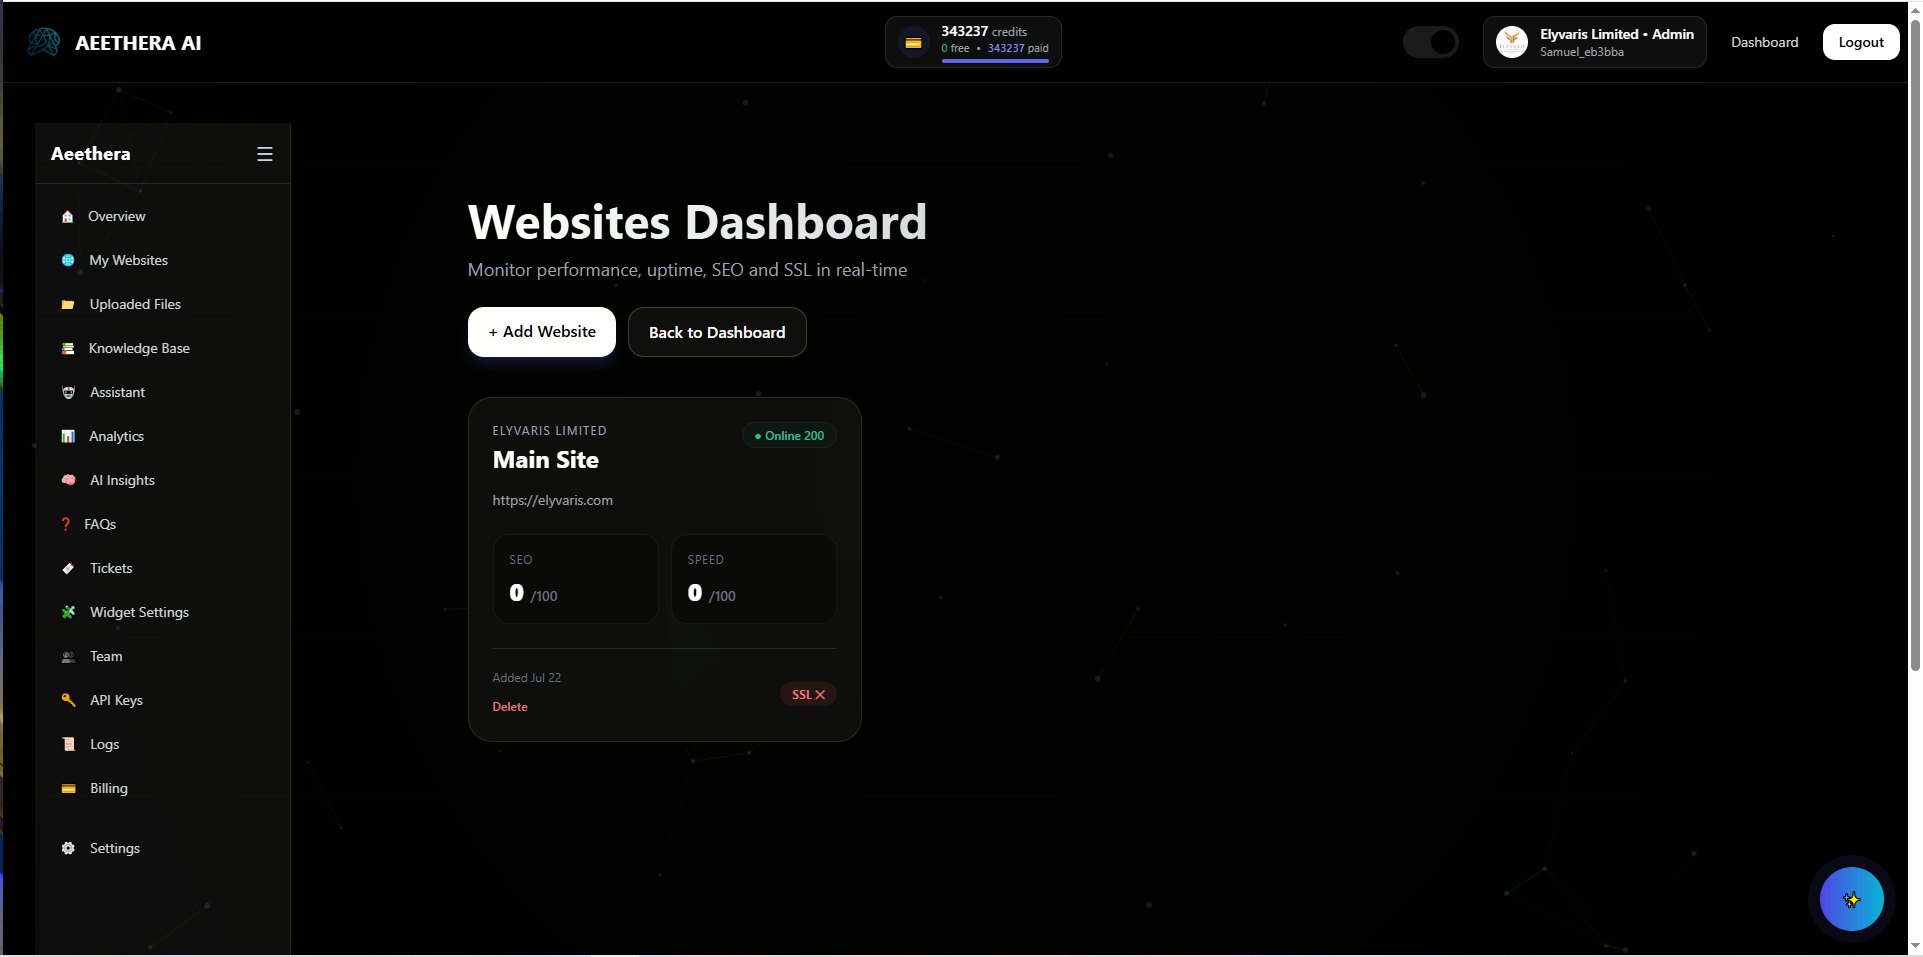
When you click the Refresh button, Aeethera performs a new analysis of your website and provides updated metrics, including:

Website Status
- Current Status – Indicates whether your website is online and accessible.
- SSL Certificate Status – Shows whether your website's SSL certificate is valid or invalid.
- Page Loading Speed – Measures how quickly your website loads for users.
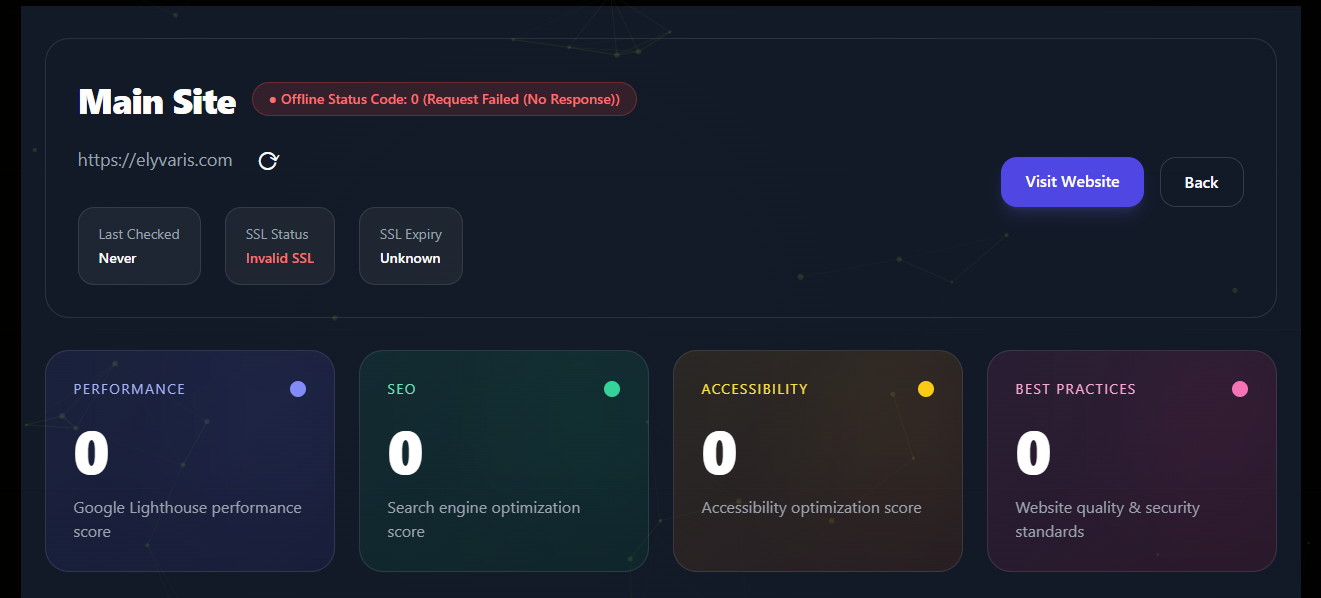
Core Web Vitals
Aeethera provides real-world performance metrics based on Lighthouse and Core Web Vitals, including:
- First Contentful Paint (FCP) – Measures how quickly the first visible content appears on the page.
- Largest Contentful Paint (LCP) – Measures how long it takes for the main content of the page to load.
- Speed Index – Indicates how quickly the contents of a page are visually displayed.
- Total Blocking Time (TBT) – Measures the amount of time the browser's main thread is blocked.
- Layout Shift (CLS) – Measures the visual stability of your page and how much elements unexpectedly move during loading.
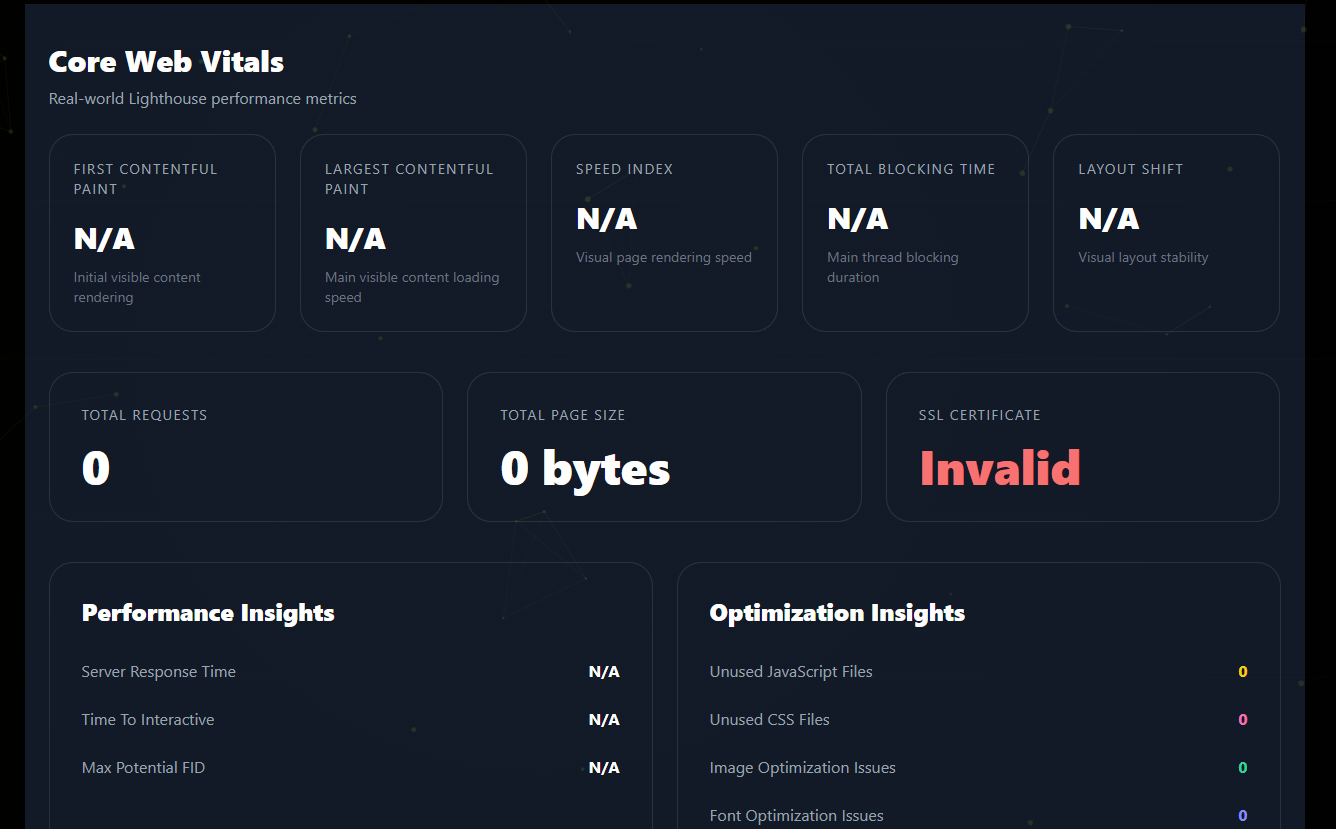
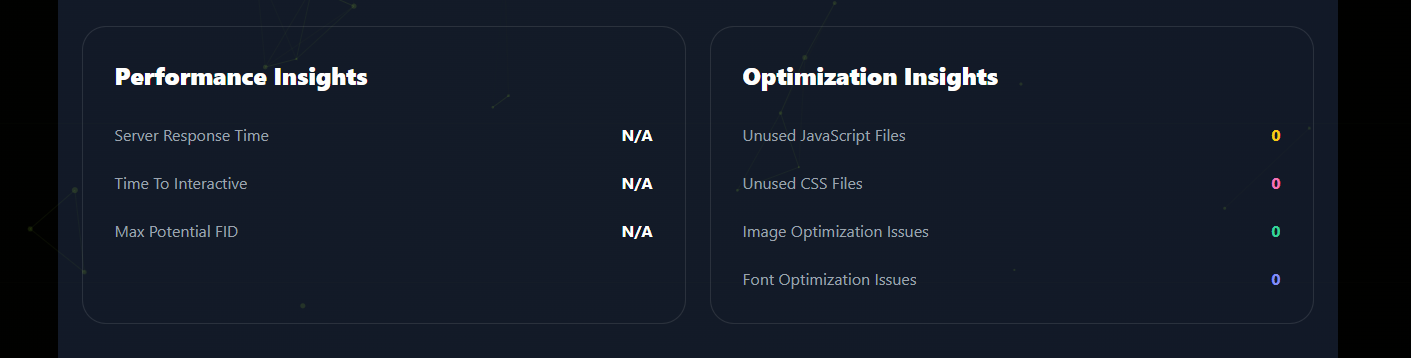
Performance Insights
Additional performance information includes:
- Server Response Time
- Time to Interactive (TTI)
- Max Potential First Input Delay (FID)
Optimization Insights
Aeethera also analyzes your website for optimization opportunities, such as:
- Unused JavaScript files
- Unused CSS files
- Image optimization issues
- Font optimization issues
Based on the analysis, recommendations will be provided to help improve your website's performance and user experience.
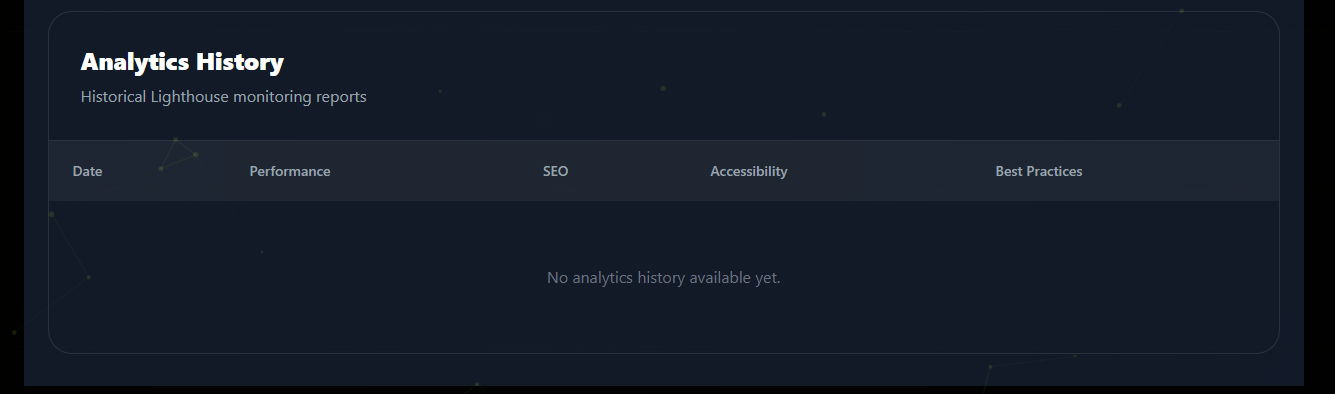
Analytics History
The Analytics History section stores historical Lighthouse monitoring reports, allowing you to track your website's performance over time and compare previous analyses.
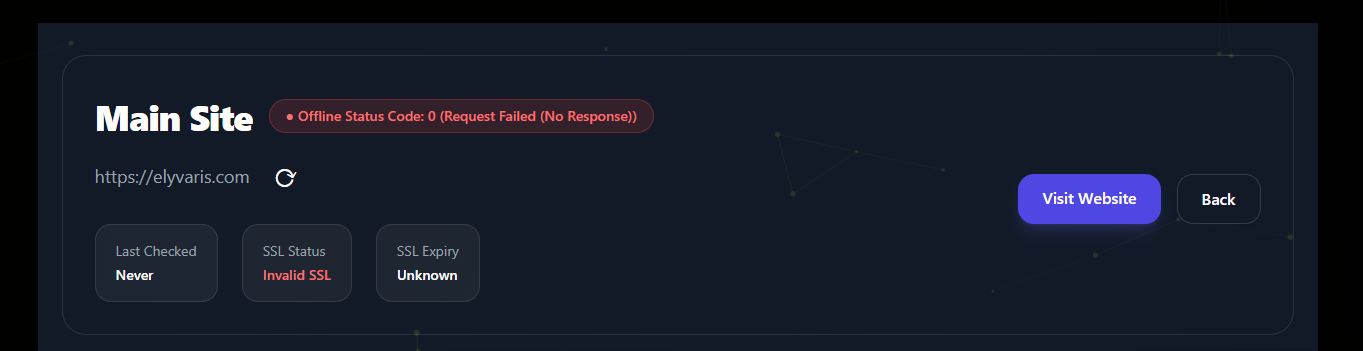
Visit Website
You can visit your website directly by clicking the Visit Website button. This will open the website you added to Aeethera in a new browser tab.
Adding a New Website
If your company manages multiple websites, you can analyze all of them within Aeethera. To add a new website:
- Click the Add Website button.
- Enter a name for the website.
- Enter the website URL or link.
- Save your changes.
Once added, the website will appear in your My Websites dashboard, where you can monitor its performance and analytics alongside your other websites.
Uploaded Files
Files Overview
The Uploaded Files page displays all the files and data sources from which your assistant obtains information. These files are processed and added to your assistant's knowledge base, enabling it to provide accurate and relevant responses.
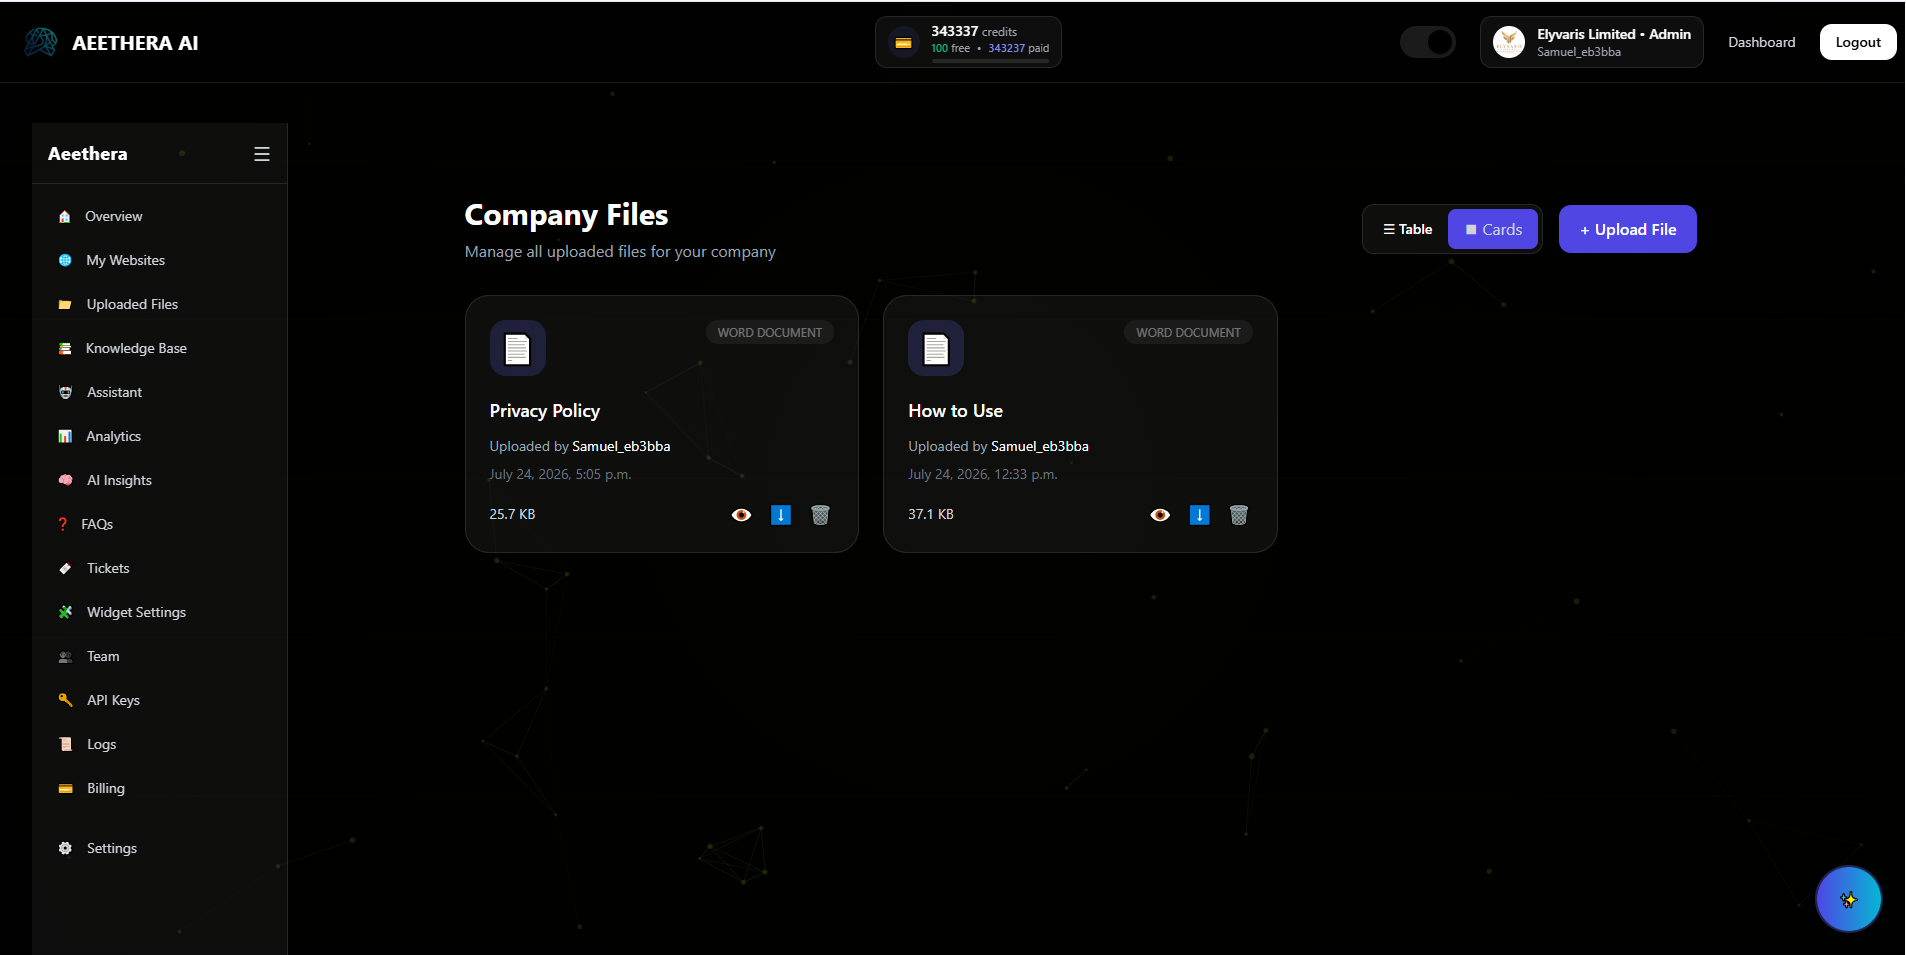
Uploading a New File
To upload a new file, click the Upload File button. Aeethera currently supports two types of data sources:
- Document Files – PDF, DOC, XLSX, CSV, and TXT files.
- Google Sheets

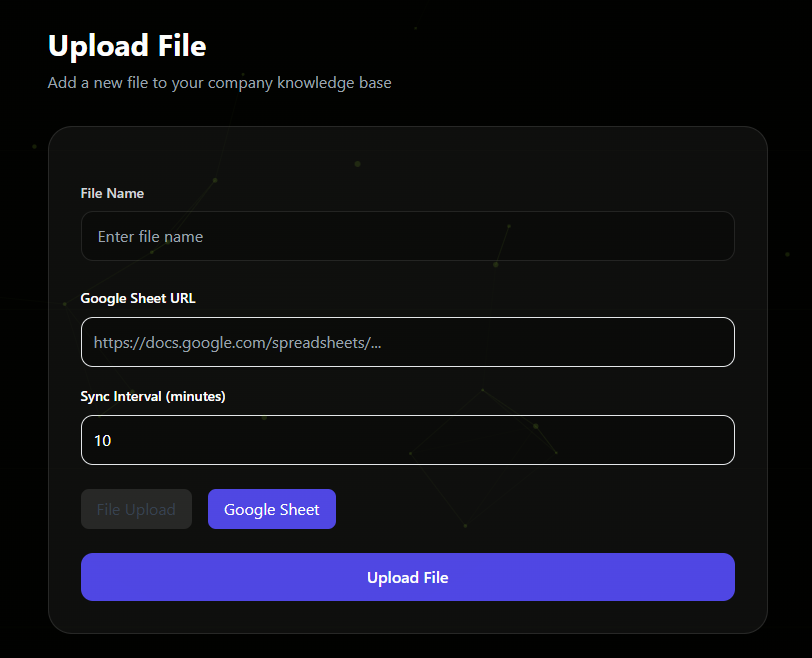
Uploading a New File
To upload a document:
- Navigate to the Upload File page.
- Click the File Upload option.
- Enter a name for the file. This will serve as the display name within Aeethera.
- Click Choose File to open the file selection dialog.
- Select the file you want to upload.
- After selecting your file, click Upload File to complete the process.
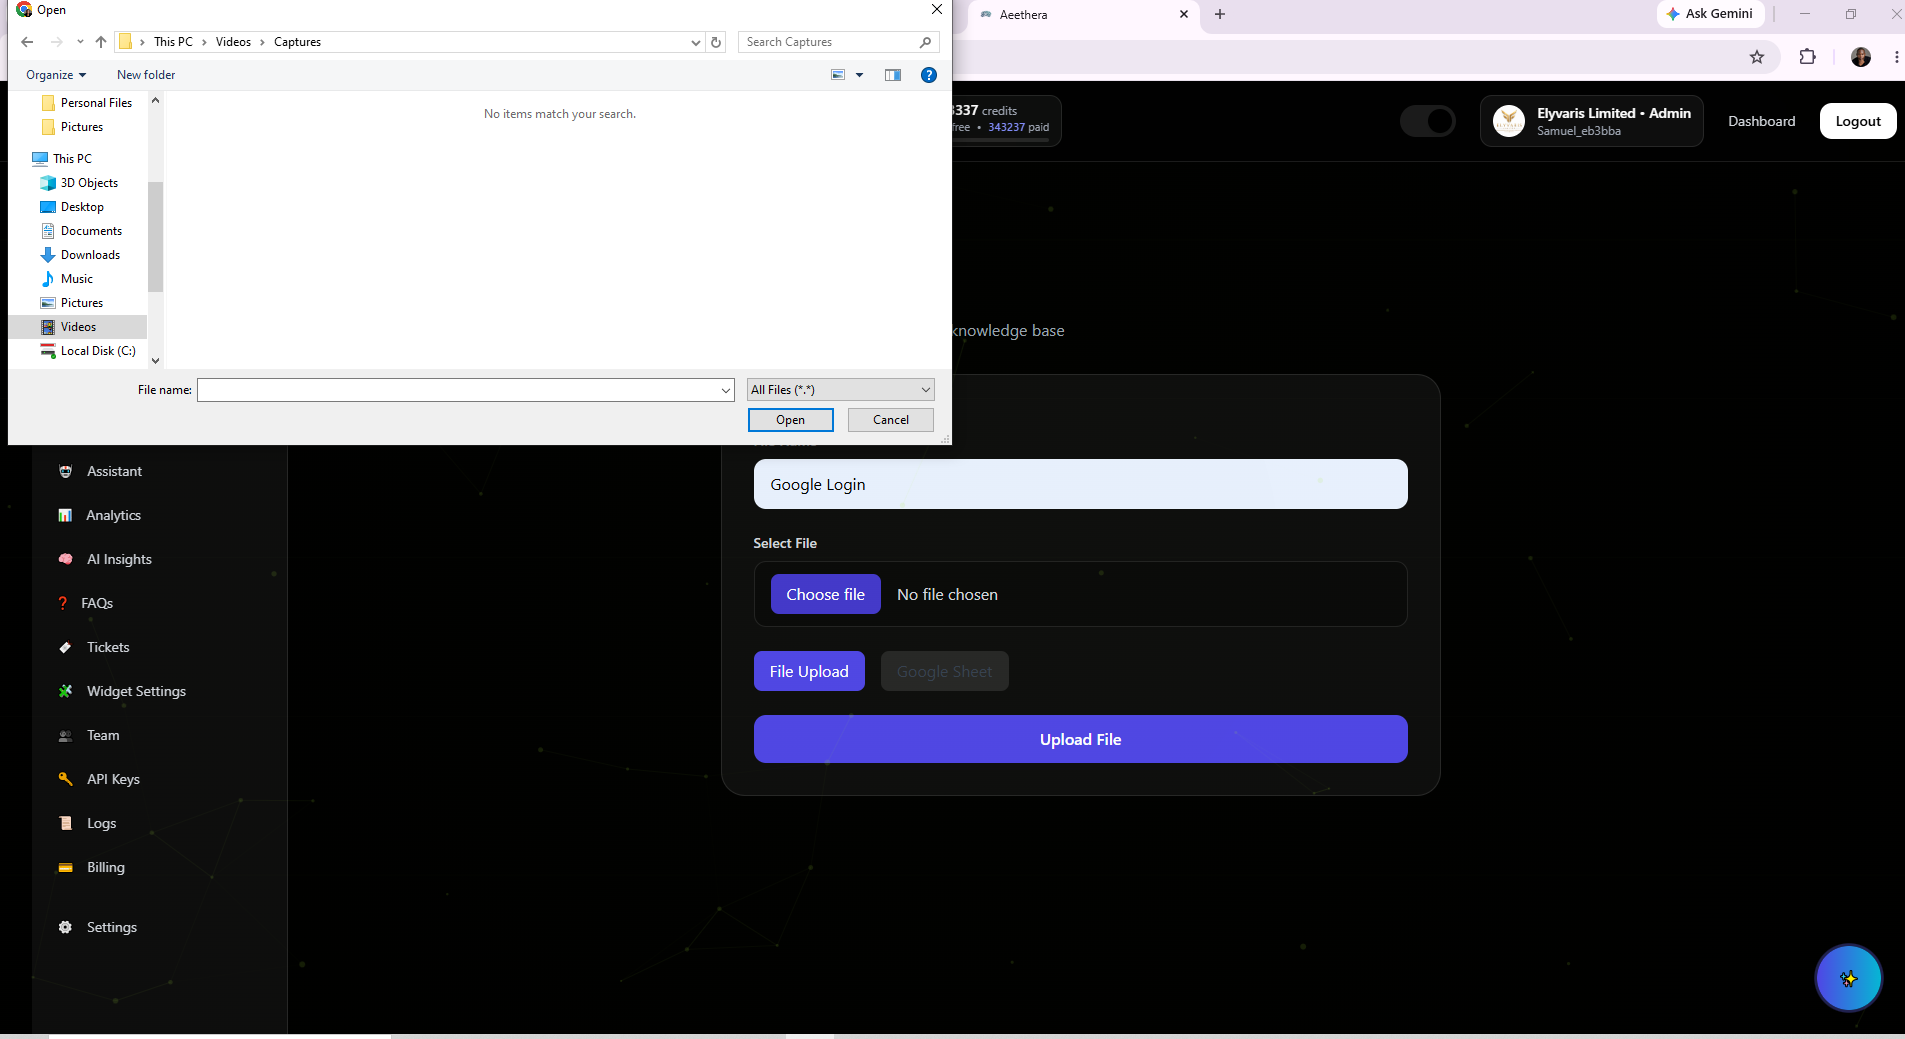
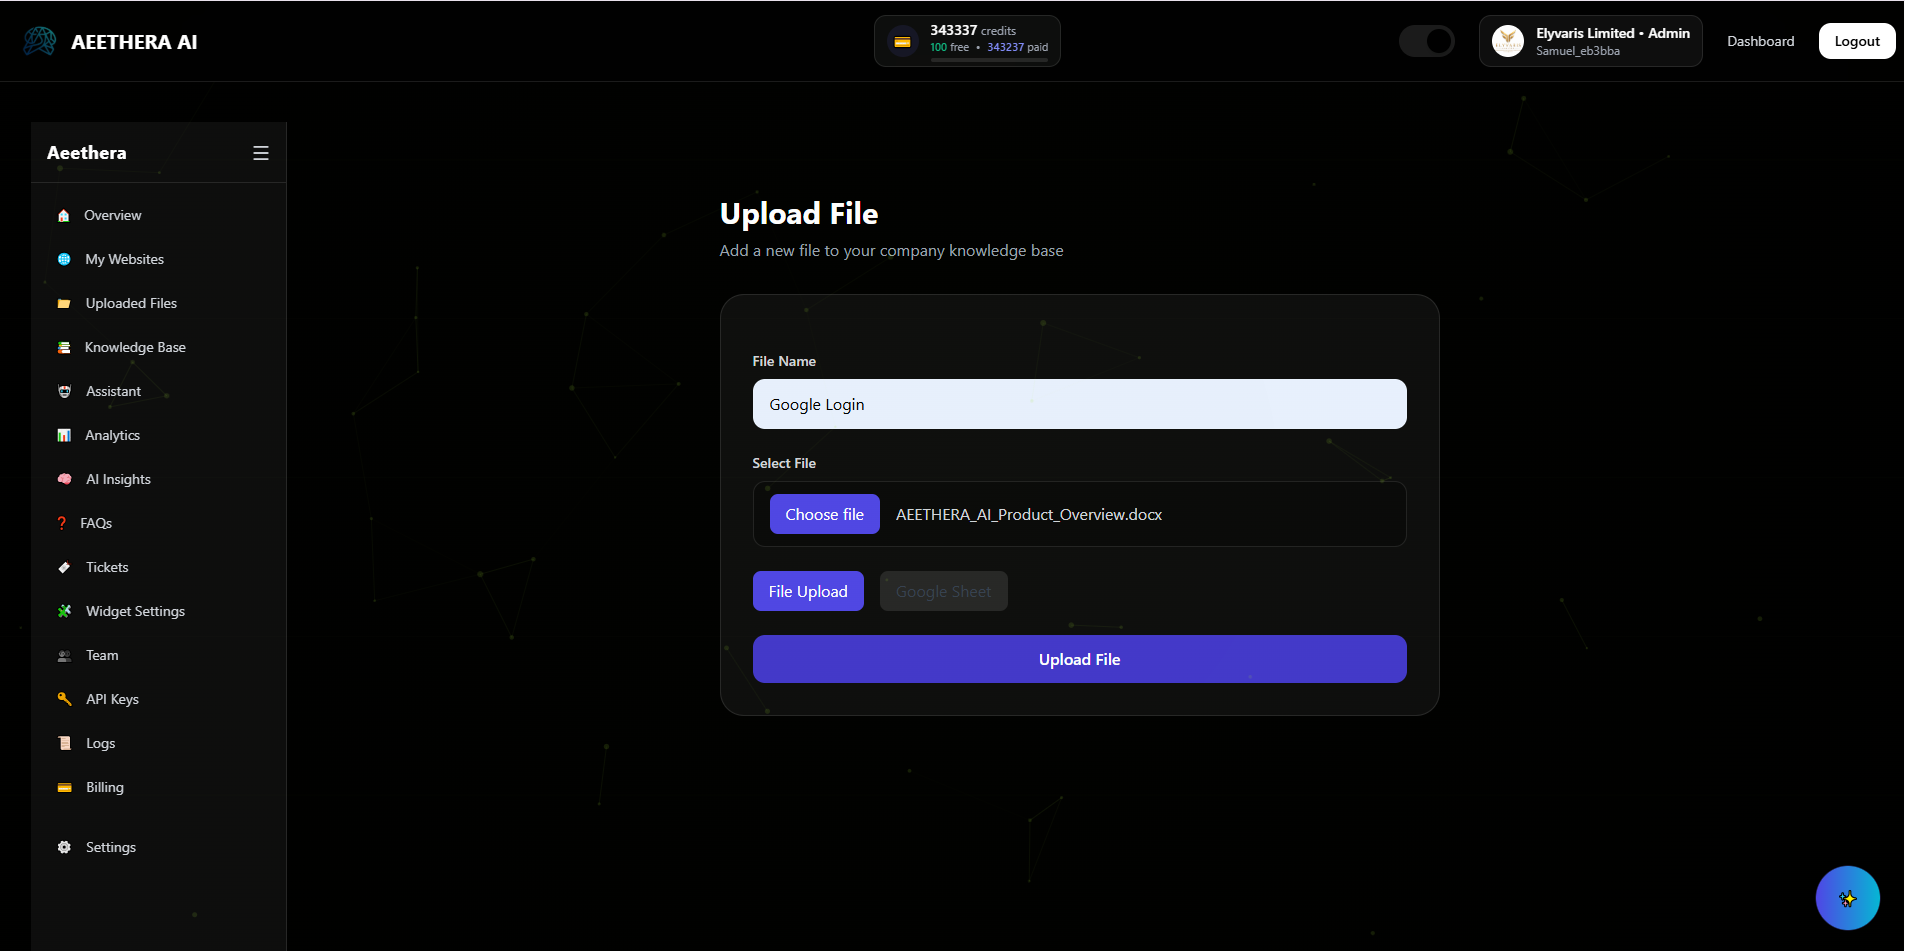
The following file formats are supported:
- PDF (.pdf)
- Microsoft Word (.doc)
- Excel Spreadsheet (.xlsx)
- CSV (.csv)
- Text File (.txt)
Uploading a Google Sheet
To upload a Google Sheet:
- Open your Google Sheet.
- Share the sheet with the following service account email: [aeethrav1@aeethera.iam.gserviceaccount.com](mailto:aeethrav1@aeethera.iam.gserviceaccount.com)
- Copy the URL of the Google Sheet.
- In Aeethera, navigate to the Upload File page and Click the Google Sheet option.
- Paste the Google Sheet URL into the provided field.
- After selecting your file, click Upload File to complete the process.
Once the upload is complete, your file will appear on the Uploaded Files page and in the Knowledge Base section with a status of Pending.
Knowledge Base
The Knowledge Base is where Aeethera prepares business information for retrieval by your AI assistants. A Knowledge Base can contain uploaded documents, Google Sheets, and website sources. Each source is extracted, converted into searchable chunks, embedded, and then attached to one or more assistants.
Website Knowledge Sources
Website Knowledge is separate from the My Websites performance-monitoring page. The My Websites page focuses on website health and performance analytics, while Website Knowledge is used to collect information that an assistant can search and use when answering questions.
Create a website source from the Knowledge Base and provide the website URL you want Aeethera to process.
Aeethera starts a crawl job and reports progress while pages are discovered and processed.
The crawler checks available sitemap information first and can fall back to internal-link discovery when a usable sitemap is unavailable.
Pages are normalized into structured content while retaining useful metadata such as the page URL, title and relevant image URLs when available.
Extracted page content is divided into retrieval-friendly chunks and embedded for semantic search.
From the assistant configuration page, select the website Knowledge Base source so that assistant can use it when answering visitors.
Replace this screenshot with the current Website Knowledge source screen.
How Website Discovery Works
Aeethera attempts to discover pages through sitemap information and internal website links. The crawler stays within the intended website scope, avoids repeatedly processing the same content, and can render JavaScript-driven pages when browser rendering is required.
- Sitemap discovery – Checks available sitemap locations and sitemap references exposed by the website.
- Internal-link fallback – When a usable sitemap is unavailable, Aeethera can discover internal pages from links.
- Depth control – Crawl depth limits how far discovery continues from the starting page.
- JavaScript rendering – Browser mode can process pages whose useful content appears after JavaScript execution.
- Dynamic-page handling – Auto-scroll and supported pagination/load-more discovery can expose additional page content.
- Duplicate protection – URL and content deduplication reduce unnecessary repeated Knowledge Base content.
Crawl Progress and Stop Crawl
During website extraction, Aeethera reports crawl progress and processing status. Website extraction also supports a Stop Crawl action. The stop request is graceful: pages already being processed may finish, but the crawler stops taking additional queued pages.
Replace this screenshot with the current crawl progress and Stop Crawl interface.
Crawl Policies and Re-Crawling
Website crawling is controlled by company-level crawl policies. These policies can limit how often a website may be crawled within a defined period. Aeethera also records crawl activity and the last successful crawl time so website sources can be managed without repeatedly running unnecessary extraction jobs.
Links and Images from Website Knowledge
Website chunks can retain the original page URL and relevant image URLs. When those URLs are retrieved with the answer context, Aeethera can provide the source page and display relevant images in the website widget.
- The original page URL can be used as a customer-facing reference.
- Relevant image URLs can be preserved with the page content.
- The assistant must not invent or reconstruct links that were not present in the retrieved source.
- The widget can render Markdown links and images supplied by the assistant response.
Replace this screenshot with an example of a widget response containing a website image and reference link.
Document Extraction
Extraction is the process of reading and converting an uploaded file into content Aeethera can prepare for retrieval. Available options depend on the file type and extraction strategy.
Extraction Strategy
The Extraction Strategy determines how Aeethera processes a document:
- Raw Text – Extracts plain text from the document.
- Structured Extraction – Preserves meaningful document structure such as headings, paragraphs and sections.
- Semantic Parsing – Uses richer parsing where supported to improve document understanding.
Parsing Mode
Parsing mode controls the balance between processing speed and extraction quality:
- Fast – Prioritizes speed.
- Balanced – Balances speed and extraction quality.
- Accurate – Prioritizes extraction quality and document understanding.
OCR Support
OCR (Optical Character Recognition) allows Aeethera to detect text inside scanned or image-based documents. It is especially useful for scanned PDFs and documents where the text cannot normally be selected.
Extract Tables
When table extraction is enabled, Aeethera attempts to preserve table structure so rows and columns remain useful during retrieval.
- Helps preserve row and column relationships.
- Improves retrieval from structured tabular information.
- Allows assistants to answer questions based on table content more reliably.
Save Output
When enabled, Aeethera saves extraction output for downstream processing. Depending on the workflow, saved output can include:
- vectors.json
- text.txt
- extract.json
Extract Images
When image extraction is available and enabled, images found in the document can be saved separately for viewing, downloading or archiving.
Embedding and Retrieval
Embedding converts extracted content into vector representations that allow Aeethera to retrieve information by meaning. The platform stores Knowledge Base vectors in PostgreSQL with pgvector and combines semantic retrieval with additional search and ranking logic before relevant chunks are sent to the assistant.
- Extracted content is split into chunks suitable for retrieval.
- Each chunk is embedded and stored with the company and Knowledge Base source it belongs to.
- Only Knowledge Base sources attached to the selected assistant are searched.
- Retrieved chunks provide the factual context used by the assistant when answering company-specific questions.
Google Sheets Synchronization
Aeethera can synchronize supported Google Sheets so changes to business data can be processed and reflected in the Knowledge Base.
Setting Up Synchronization
- Upload or connect the Google Sheet using the supported Aeethera flow.
- Open the synchronization setup shown for that source.
- Follow the instructions supplied by Aeethera for the connected sheet.
- Complete any Google authorization steps required by the selected integration method.
How Synchronization Works
When a synchronized sheet changes, Aeethera can trigger the required extraction and embedding workflow so the assistant can use updated business information without requiring a completely new manual Knowledge Base setup.
Assistants
Assistants Overview
The Assistants page displays all the AI assistants created by your company, including both active and disabled assistants.
From this page, you can:
- View all assistants belonging to your company.
- Test each assistant to see how it responds to customer questions.
- Create new assistants.
- Manage existing assistants.
- Enable or disable assistants.
When an assistant is disabled, it will immediately stop responding to questions from users on your website. You can re-enable it at any time to resume its operation.
Creating an Assistant
To create a new assistant, click the "Create Assistant" button. You will first be taken to the assistant creation page, where you can specify:
- Assistant Name – The unique name of the assistant.
- Temperature – Controls how creative or deterministic the assistant's responses are.
- Description – A brief explanation of the assistant's purpose.
- System Prompt – Instructions that define how the assistant should behave.
Note: Only the Assistant Name is mandatory. All other settings can be configured later.
After creating the assistant, you will be redirected to the assistant configuration page.
Assistant Configuration
The following settings can be customized:
Bot Name
The Bot Name is the name that will be displayed to your customers on your website.
Tone
Defines the communication style of the assistant, such as:
- Professional
- Friendly
- Casual
- Formal
- Technical
Personality
Determines the assistant's character and behavior when interacting with users. Examples include:
- Helpful and informative
- Friendly and conversational
- Professional and concise
- Creative and engaging
Business Context
Provides information about your company, products, services, and industry. This context helps the assistant give responses that are more relevant to your business.
Description
A short summary describing the assistant's purpose and responsibilities.
System Prompt
The System Prompt contains the instructions that guide the assistant's behavior, response style, restrictions, and overall personality. This is one of the most powerful customization options, as it determines how the assistant behaves in different situations.
Temperature
The Temperature setting controls how deterministic or creative the assistant's wording can be. In the current assistant configuration, the control ranges from 0.0 to 1.0.
- 0.0 – 0.3: More precise and predictable.
- 0.4 – 0.7: Balanced wording with some variation.
- 0.8 – 1.0: More varied and creative wording.
Minimum Answer Confidence
Minimum Answer Confidence controls how strongly the available verified information should support an answer. The value ranges from 0.00 to 1.00.
- Lower values make the assistant more willing to answer from semantically related or partial verified information.
- Higher values make the assistant more conservative when the available information is weak.
- The assistant should still provide useful supported information when available instead of refusing an entire question because one detail is missing.
Knowledge Base
The Knowledge Base section lets you select the enabled knowledge sources this assistant is allowed to search. Sources can include uploaded files, supported Google Sheets, and completed website Knowledge sources.
- Only sources attached to this assistant are used during Knowledge Base retrieval.
- Website Knowledge can retain original page links and relevant image URLs.
- When a relevant verified source link or image reaches the assistant context, the assistant can include it in the customer response.
- If no Knowledge Base source is attached, the assistant has no company Knowledge Base content to search.
After configuring the assistant, click Save to apply the changes.
Managing Existing Assistants
Existing assistants can be managed by clicking the "Manage" button on the Assistants page. From the management page, you can update:
- Tone
- Personality
- Business Context
- Description
- System Prompt
- Temperature
- Minimum Answer Confidence
- Knowledge Base
Any changes you make are applied immediately after saving. This flexibility allows you to continuously improve your assistants as your business grows, ensuring they always provide accurate and relevant responses to your customers.
Analytics
Analytics Overview
The Analytics page provides a comprehensive overview of how customers interact with your assistants. It helps you monitor engagement, understand customer behavior, and measure the performance of your AI assistants.
At the top of the page, you will find key metrics such as:
- Total Interactions – The total number of messages exchanged between customers and your assistants.
- Total Sessions – The total number of customer conversations or chat sessions.
- Average Messages per Session – The average number of messages exchanged during each conversation.
- Top Assistant – The assistant with the highest number of interactions within your company.
The Analytics dashboard gives you a real-time overview of customer engagement, helping you understand how your AI assistants are performing and how customers interact with your business.
Customer Intent Analysis
Aeethera automatically analyzes customer conversations and categorizes them into different intents.
A pie chart is displayed to show the distribution of customer intents, helping you understand:
- What customers ask about most frequently.
- The types of support or information they seek.
- Trends in customer interests and needs.
This insight allows you to make informed business decisions and improve your products or services based on actual customer interactions.
Customer Intent Analysis helps you discover what your customers care about most, enabling you to improve products, services, and customer satisfaction using real conversation data.
Exporting Analytics
From the Analytics page, you can:
- View detailed analytics and performance metrics.
- Generate AI-powered business reports.
- Download analytics data as a CSV file for further analysis or record keeping.
Exporting analytics makes it easy to archive data, share insights with your team, or perform advanced analysis using spreadsheet applications.
Recent Conversations
Below the analytics dashboard, you will find a list of the most recent conversations between your customers and your assistants.
This section allows you to:
- Review customer questions.
- Monitor assistant responses.
- Understand how your assistants are performing in real-world interactions.
- Identify opportunities for improvement.
Monitoring recent conversations helps ensure your assistants provide accurate, helpful, and consistent responses while highlighting areas where additional knowledge or prompt improvements may be needed.
Reviewing conversations regularly helps you identify customer concerns, improve your assistants, and maintain a high-quality customer experience.
Generate Report
The Generate Report feature uses Aeethera's AI capabilities to analyze customer conversations and create detailed business reports.
Using information gathered from chats between your customers and assistants, Aeethera generates comprehensive reports that include:
- Customer behavior analysis.
- Common customer requests and inquiries.
- Trending topics and interests.
- Customer pain points and challenges.
- Suggestions for improving customer satisfaction.
- Recommendations for enhancing your products, services, or business processes.
These reports provide valuable insights into how your customers interact with your business and help you make data-driven decisions.
AI-generated reports transform thousands of customer conversations into actionable business intelligence, allowing you to make smarter decisions with confidence.
View Reports
The View Reports page is where all previously generated reports are stored.
From this page, you can:
- View detailed reports generated by Aeetherra.
- Review past customer behavior analyses and recommendations.
- Download reports for offline viewing or sharing with your team.
- Keep a historical record of your company's customer interactions and AI insights.
Reports are organized by date and can be accessed at any time, allowing you to track changes in customer behavior and measure the impact of improvements made to your products, services, or assistants over time.
If you wish to keep a copy of a report, simply click the "Download" button next to the report, and it will be downloaded to your device.
By understanding your customers' behaviors, preferences, and needs, you can continuously improve your company and deliver better experiences through your AI assistants.
Analytics is more than numbers—it gives you the intelligence needed to understand your customers, optimize your AI assistants, and continuously improve your business using real-world customer interactions.
Tickets
Tickets Overview
The Tickets page is where you manage customer requests that have been escalated by your assistants.
An escalation occurs when:
- The assistant is unable to handle a customer's request.
- The customer requests to speak with a human agent.
Whenever an assistant cannot resolve a customer's request, Aeethera automatically escalates the conversation into a support ticket so that your team can continue assisting the customer without losing any information.
Ticket Notifications
When a ticket is created, Aeethera automatically sends an email to the customer.
This email includes:
- A unique ticket number for reference.
- Confirmation that their request has been received.
- Details for tracking their issue.
These notifications reassure customers that their request has been successfully received and provide them with a reference number for future communication.
Managing Tickets
From the Tickets page, you can:
- View all escalated customer tickets.
- Open and review each ticket in detail.
- Respond to customers directly from Aeethera.
- Reply via the customer's provided email address or phone number.
- Update the status of each ticket (e.g., Open, In Progress, Resolved).
- Delete tickets if necessary.
Ticket management provides your support team with a centralized workspace for handling customer issues from creation through resolution.
Ticket Communication
You can communicate with customers directly within Aeethera or use their contact details to continue the conversation outside the platform.
This flexibility allows your support team to choose the most appropriate communication method while maintaining excellent customer service.
Whether you reply inside Aeethera or contact the customer directly by email or phone, all escalated requests remain organized and easy to track.
Ticket Control
Each ticket can be fully managed by your team, allowing you to:
- Track ongoing issues.
- Ensure timely responses.
- Maintain organized customer support records.
- Close or remove tickets when they are no longer needed.
Proper ticket management ensures that every customer issue receives attention and that your support workflow remains organized and efficient.
The Tickets page ensures that no customer request is lost. Every escalated issue is properly tracked, assigned, managed, and resolved, helping your team deliver exceptional customer support.
Widget Settings
Widget Settings Overview
The Widget Settings page allows you to customize how your assistant widget appears and behaves on your website.
From this page, you can view all your existing assistants and configure their widget appearance and behavior.
Widget Settings gives you complete control over how your AI assistant is presented to visitors, allowing you to match your company's branding and create a better customer experience.
Opening Widget Studio
To begin customizing your assistant widget, click the "Open Widget Studio" button.
This opens the Widget Studio configuration panel where you can customize both the appearance and behavior of your assistant widget before publishing it to your website.
Widget Customization Options
Inside the Widget Studio, you can configure the following settings:
Header Color
Set the color of the widget header to match your brand identity and website theme.
Choosing a color that aligns with your branding helps create a consistent and professional appearance across your website.
Bot Name
Define the name of your bot as it will appear to users on your website.
This name is displayed within the chat widget and helps customers identify which assistant they are interacting with.
First Message
Set the initial message that appears in the chat box when a visitor opens the widget.
This is the first interaction users will see from your assistant and is an excellent opportunity to welcome visitors and encourage engagement.
Widget Position
Choose where the widget button appears on your website.
Common positions include:
- Bottom right corner.
- Bottom left corner.
- Other supported layout positions depending on your website configuration.
Auto Open Setting
Control whether the chat widget automatically opens when a visitor enters your website.
- Enabled – The message box opens automatically when the page loads.
- Disabled – Visitors must click the widget button before the chat window opens.
This setting allows you to decide whether you want the assistant to proactively engage visitors or wait until they choose to start a conversation.
The Widget Settings page gives you full control over your assistant's appearance, branding, behavior, and visitor experience. By customizing these settings, you can create a widget that feels like a natural extension of your website while maximizing customer engagement.
Teams
Teams Overview
The Teams page is where you manage all members of your company within Aeethera.
From this page, you can:
- View all existing team members.
- Create new members.
- Manage member roles and permissions.
- Delete or remove members from the company.
The Teams page allows you to build and manage your company's workforce within Aeethera, ensuring that every member has the appropriate level of access and responsibility.
Creating a New Member
To add a new team member, simply click the "Create Member" button.
The new user will automatically be added to your company and assigned a role based on your organization's requirements.
Member Roles
Every user in your company belongs to one of the following roles:
- Viewer – Can only view assigned dashboards and data. This role does not have permission to edit or modify company information.
- Staff – Can access and interact with assigned features based on the permissions granted by the administrator.
- Manager – Has elevated privileges and can manage specific parts of the system depending on the permissions configured by the company administrator.
A user can only hold one role at a time. Their assigned role determines the level of access they have throughout the Aeethera platform.
Managing Members
As an administrator, you can click on any team member to manage their account.
From the member management page, you can:
- Set or update their permissions.
- Control what they can view or access on their personal dashboard.
- Monitor their activity (based on available analytics permissions).
These permissions allow you to control exactly how each member interacts with Aeethera while ensuring sensitive information remains accessible only to authorized personnel.
Deleting Members
Members can be removed from your company in two ways:
- By the Administrator.
- By users who have been granted permission to manage members.
When a member is deleted, their access to the company dashboard is immediately revoked, preventing them from accessing company data or resources.
The Teams page gives you complete control over your company's organizational structure. By assigning roles, configuring permissions, and managing access, you can ensure every team member has the right level of responsibility while keeping your business secure and well organized.
API Keys
API Keys Overview
The API Keys page is one of the most important security sections within Aeethera. It controls how your assistant widget is authenticated, where it can be used, and ensures that only authorized websites can communicate with your AI assistants.
The API Keys page protects your assistants by ensuring they can only be accessed from websites you explicitly authorize.
Allowed Domains
The Allowed Domains section defines the list of websites that are permitted to use your assistant widget.
For your widget to function correctly:
- The website domain must be added to the Allowed Domains list.
- If a domain is not added, the widget may still appear on the page, but visitors will not be able to interact with your assistant.
This security measure prevents unauthorized websites from embedding and using your AI assistant.
Assistant Public ID
Every assistant created within Aeethera is automatically assigned a unique Public ID.
This Public ID is used to:
- Identify the specific assistant being accessed.
- Verify the company associated with the assistant.
- Secure communication between your website and Aeethera.
Aeethera uses the Public ID to ensure every request is authenticated and correctly routed to the appropriate assistant.
Every assistant has its own unique Public ID. This identifier acts as the bridge between your website and your AI assistant.
Widget Integration Script
To display the Aeethera assistant on your website, add the following script to any page where you want the widget to appear:
<script src="https://widget.aeethera.com/widget.js"
                    data-assistant="public_id"></script>
How It Works
- Replace
public_idwith your assistant's actual Public ID. - Once the script is added, the widget automatically loads on your website.
- The assistant will only function on domains listed in your Allowed Domains section.
No additional JavaScript configuration is required. Simply include the script and your assistant will automatically initialize whenever a visitor loads your website.
By combining Allowed Domains, Assistant Public IDs, and the Widget Integration Script, Aeethera provides a secure and reliable way to deploy AI assistants while ensuring they can only be used on websites you authorize.
Logs
Logs Overview
The Logs page provides a complete record of activities within your Aeethera company system. It is designed to help administrators monitor system usage, track user actions, and maintain transparency across the platform.
Activity logs provide complete visibility into your company's usage of Aeethera, helping administrators maintain security, accountability, and operational transparency.
What the Logs Track
The Logs page automatically records important activities performed throughout your Aeethera company account.
Recorded activities include:
- User login and logout events.
- Timestamps showing when users access the system.
- Pages visited within the Aeethera platform.
- System actions performed by users, including future tracking features as they become available.
These records provide administrators with a clear overview of how the platform is being used across the organization and help maintain accurate historical records.
Activity Monitoring
By reviewing activity logs, administrators can:
- Track who accessed the system and when.
- Monitor user navigation and platform usage.
- Identify unusual or suspicious activity.
- Maintain accountability across all team members.
Continuous monitoring enables administrators to quickly detect irregular behavior, improve operational oversight, and ensure company policies are being followed.
Activity logs act as an audit trail, allowing administrators to understand who performed actions, when they occurred, and how the system is being used throughout the company.
Enabling or Disabling Logs
The activity logging system can be enabled or disabled by the company administrator at any time.
To manage activity logging:
- Navigate to the Settings page.
- Locate the option labeled "Enable Activity Logs".
- Toggle the checkbox to enable or disable logging.
When logging is disabled, Aeethera immediately stops recording new activity logs for your company. Existing logs remain available unless they are manually removed according to your organization's data retention policy.
The Logs page is an essential administrative tool that helps organizations maintain visibility, improve security, monitor user activity, and ensure accountability across every department using Aeethera.
Billing
Billing is Coming Soon
We are actively developing the Billing module to provide a seamless way to manage your Aeethera subscription, payments, invoices, and account usage.
What to Expect
Once released, the Billing page will provide everything you need to manage your Aeethera subscription and payment information from one centralized location.
Planned features include:
- View your current subscription plan.
- Upgrade or downgrade your plan.
- Manage payment methods.
- View and download invoices.
- Monitor account usage and billing history.
- Review upcoming payments and renewal dates.
- Access transaction records for your company.
The Billing module is currently under development and will be available in a future release of Aeethera.
Our goal is to provide a secure, transparent, and easy-to-use billing experience that gives you complete control over your subscription and account payments.
Account Settings
Account Settings Overview
The Account Settings page allows you to manage and update your personal account information, including your username and password.
Keeping your account information up to date helps maintain account security while ensuring you always have access to your Aeethera workspace.
The Account Settings page gives you complete control over your login credentials, allowing you to securely manage your account whenever needed.
Updating Your Username
To change your username:
- Go to the Settings page.
- Locate the Username field.
- Edit your username.
- Click Save to apply the changes.
Once saved, your updated username will immediately become your new login username and will be reflected throughout your Aeethera account.
Changing Your Password
To update your password, follow these steps:
- Go to the Settings page.
- Enter your current (old) password.
- Enter your new password.
- Confirm the new password and click Save.
For security reasons, Aeethera requires your current password before allowing you to create a new one. This helps prevent unauthorized users from changing your account credentials.
We recommend using a strong password that combines uppercase letters, lowercase letters, numbers, and special characters to better protect your account.